Data View: Overview
A data view is a container specific to Customer Journey Analytics that lets you determine how to interpret data from a connection. It enables you to create a filtered view of the data by specifying how you want to interpret elements of the data in the connection, such as metrics, dimensions, sessions.Data views are defined in preparation for reporting on the data in Workspace.
In JA, you can:
-  Create different data views for the same connection with different settings, such as visit timeout,attribution.
- Create multiple data views for a single dataset. For example, you can create one data view where all dimensions are set to Last Touch, and, simultaneously, another data view with dimensions set to First Touch.
- Toggle between different data views.
Data View Configuration Settings
The table below describes the data view settings and containers to configure when creating a data view:
| Setting | Definition / Use case |
|---|---|
| Connection | Links the data view to the connection that you established earlier, which contains the Experience Platform datasets - required. |
| Name | Provides a name to the data view - required |
| Description | Provides a detailed description of the data view - optional |
| Time zone | Selects a time zone for your data view |
| Containers | Definition / Use case |
| Person container name | Person (default). The Person container includes every visit and page view for visitors within a specified time frame. You can rename this to‘User’ or any other term you prefer |
| Session container name | Session (default). The Session container lets you identify page interactions, campaigns, or conversions for a specific session. You can rename this to ‘Visit’ or any other term you prefer |
| Event container name | Event (default). The Event container defines which page events you would like to include or exclude from a filter |
Data Components
The components include dimensions, metrics, filters, calculated metrics, and date Ranges. Data Views by default include Standard Components. These are system generated and are required for all DataViews, as shown:
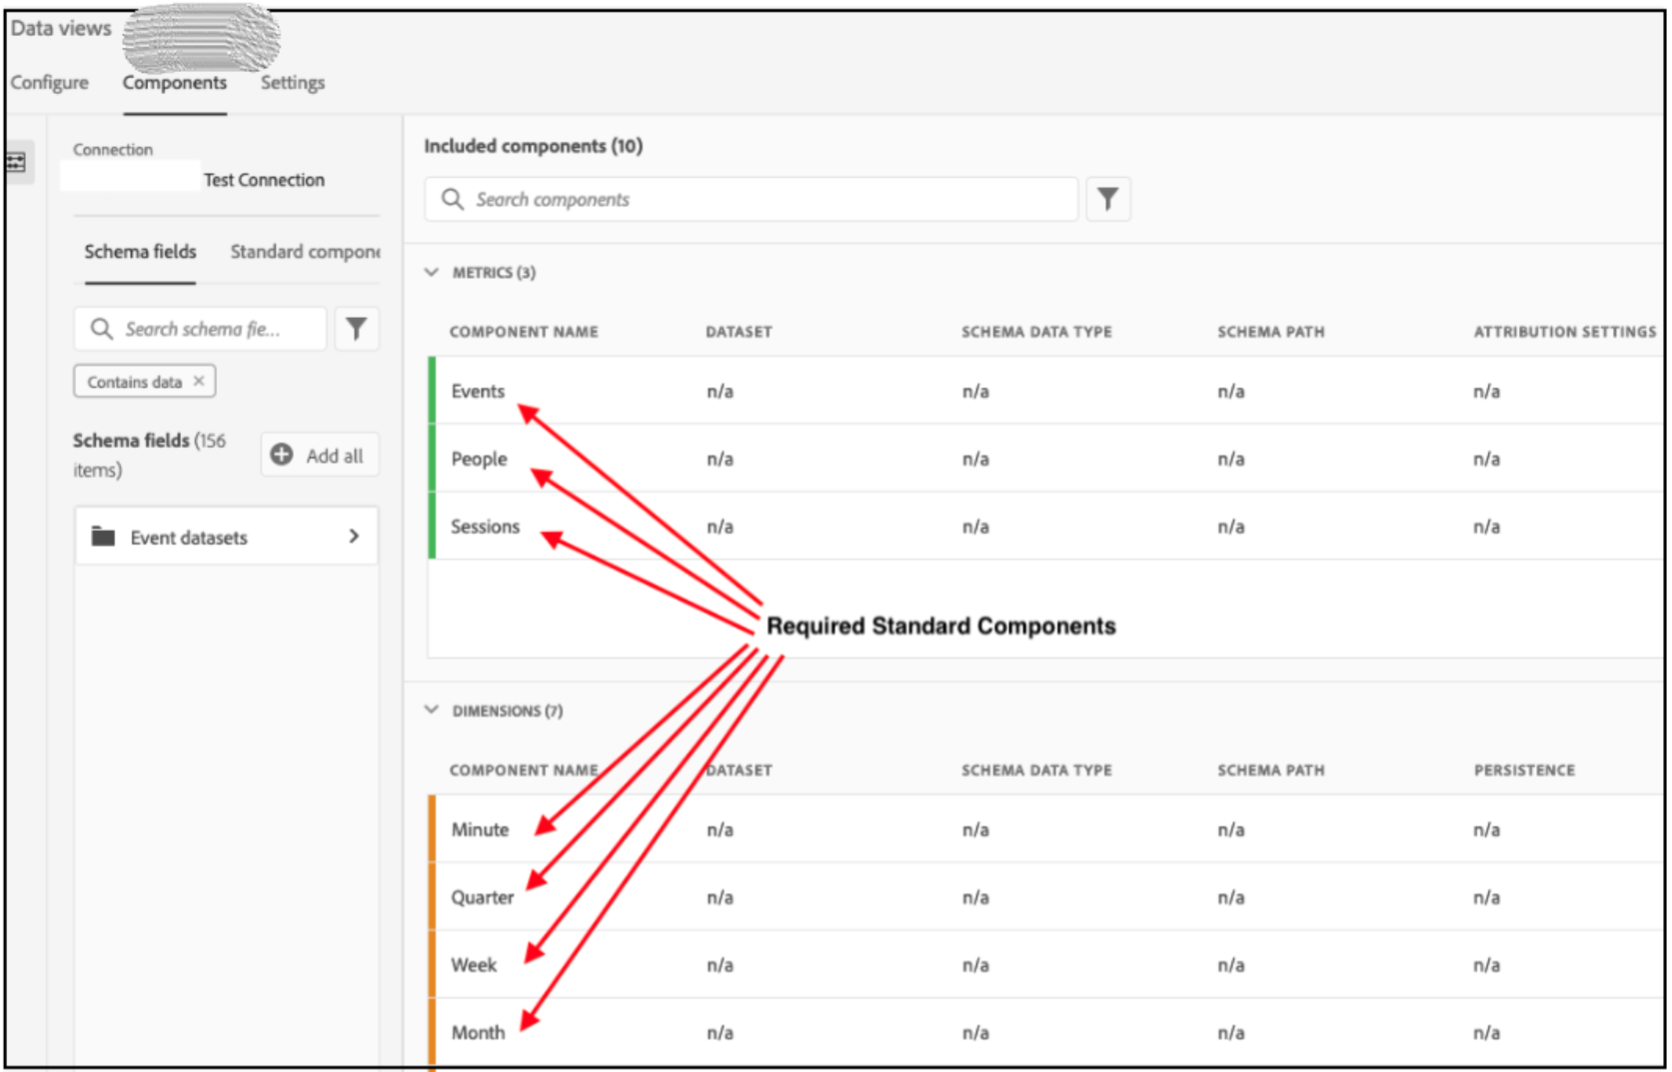 Adobe also applies the filter Contains data by default, so that only Schema fields that contain data appear. If you want a field that does not contain data, remove this filter.
Data View Components Settings
| Setting | Definition / Use case |
|---|---|
| Component Type | Required. Allows you to change a component from Metric to Dimension or vice versa. |
| Component Name | Required. Let’s you specify the friendly name that will appear in Analysis Workspace. You can rename a component to give it a data- view- specific name |
| Description | Optional, but recommended, to provide information on the component for other users |
| Schema Field Name | The name of the schema field |
| Dataset Type | Required. A non-editable field showing which dataset type(event, lookup, or profile) the component came from |
| Dataset | Required. A non-editable field showing which type of field the component came from (e.g., String, Integer, etc.). This field can contain multiple datasets |
| Schema data type | Refers to whether the component is a string, integer, etc |
| Component ID | Required. The CJA API uses this field to reference the component. You can click the edit icon and modify this component ID. However, changing this component IDbreaks all existing Workspace projects that contain this component.If you ever create another data view that uses a different field for a pageTitle dimension, you can rename it and make the dimension cross-data view compatible |
| Schema Path | Event (default). The Event container defines which page events you would like to include or exclude from a filter |
| Hide component in reporting | Default = off. Let’s you curate the component out of theData View when used in reporting. This does not impact permissions, just component curation. In other words, you can hide the component from non- Admins in reporting.Admins can still access it by clicking Show All Components in an Analysis Workspace project. |
| Persistence | 1. Dimension persistence is a combination of allocation and expiration. 2. Together, they determine how or whether dimension values persist from one event to the next. Dimension persistence is configured on a dimension withinData Views and is retroactive and non-destructive to the data it is applied to |
| Allocation | Allocation applies a transformation to the underlying value you are using. Supported allocation models include: Most recent: persist the most recent (by timestamp)value present in the dimension. Original: persist the original value (by timestamp)present within the dimension for an expiration period. All: can be applied to both array-based dimensions or single-value dimensions. It acts similarly to theParticipation attribution model for metrics |
| Expiration | Expiration lets you specify the persistence window for a dimension. There are four ways to expire a dimension value: Session (default): Expires after a given session. Person: Expires at the end of your reporting window. Time: You can set the dimension value to expire after a specified time period (up to 90 days). This expiration option is only available for Original and Most Recent allocation models. When using time- based expiration,values previous to the start of your reporting window(up to 90 days) are considered. Metric: You can specify any of the defined metrics asthe expiration end for this dimension (Purchase). Thisexpiration is only available for Original and MostRecent allocation models |
No value options
No Value Options settings are analogous to Unspecified or None values in reporting. The options are,shown:
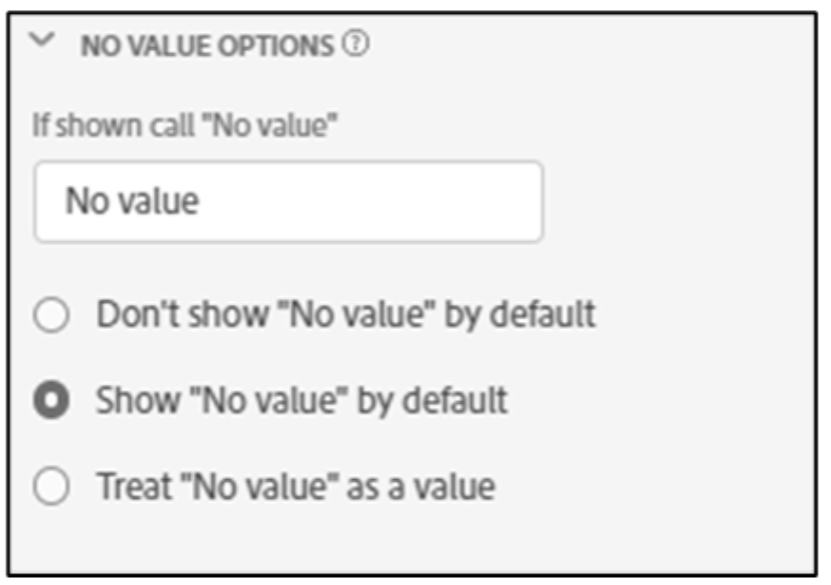
In the data views UI, on a component-by-component basis, you can decide how you want thesevalues to be treated in reporting. You can also rename No value to something that better suits yourenvironment, such as Null, Not set, or others.
Also note that whatever you specify in this field can be used for special UI treatment of the NoValue line item in reporting as stated in the No Value Options setting. Configure the defaultbehavior for when no value is present in a dimension.
The No value option settings are, as shown:
| Setting | Definition / Use case |
|---|---|
| If shown, call No value... | This is where you can rename No value to something else. |
| Don’t show No value bydefault | Does not show this value in reporting. |
| Show No value by default | Does show this value in reporting. |
| Treat No value as a value | This setting will replace blank values in the data with the text thatyou specified under If shown, call No value ... For example, if youhad Mobile device types as the dimension, you could renamethe No value item to “Desktop”. Note that when you change thisfield to a custom value, the custom value will be treated as alegitimate string value. Therefore, if you enter the value “Red” intothis field, any instances of the string “Red” appearing in the dataitself will also roll under the same line item that you havespecified. |
Include exclude values
This setting allows you to modify the underlying data that you are reporting on, at query time. It is notthe same as a filter. But filters will respect this new dimension, as will pathing and attribution.You can use these values to narrow a dimension to only include values matching specific criteria. Inclusionsor exclusions occur prior to allocation or reporting filters.
For example, you could create a dimension out of the pageTitle field, but call it “error pages” andinclude any page that contains the phrase “error”.
The settings are, as shown:
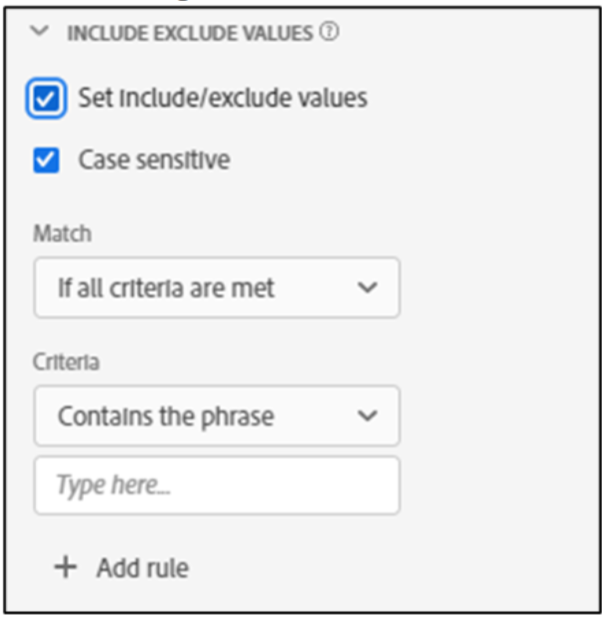
The table below describes the settings for Include exclude values:
| Setting | Definition / Use case |
|---|---|
| Case sensitive | Default = On. This setting applies only to the Include/Exclude Values section. It allows you tosay whether the include/exclude rule you are applying should be case sensitive. |
| Match | Allows you specify which values you would like to consider for reporting prior to attributionand filters (e.g., only use values containing the phrase “error”). You can specify: If all criteriaare met, or If any criteria are met. |
| Criteria | Allows you specify the match logic that should be applied to a specific filter rule. 1. String: Contains the phrase, Contains any term, Contains all terms, Does not containany term, Does not contain the phrase, Equals, Does not equal, Starts with, Ends wit. 2. Double/Integer: equals, does not equal, is greater than, is less than, is greater thanor equal to, is less than or equal to. 3. Date: equals, does not equal, is later than, is before, occurs within. |
| Match operand | Allows you specify the match operand that the match operator should be applied to. 1. String: Text field. 2.Double/Integer: Text Field with up/down arrows for numeric values. 3. Date: Day granularity selector (calendar). 4. Date Time: Date and time granularity selector |
| Add rule | Allows you specify an additional match operator and operand. |
Persistence
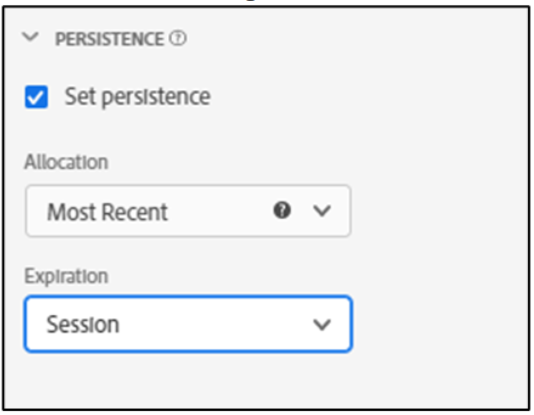
Dimension persistence is a combination of allocation and expiration. Together, they determine how orwhether dimension values persist from one event to the next. Dimension persistence is configured ona dimension within Data Views and is retroactive and non- destructive to the data it is applied to.
Dimension persistence is an immediate data transformation applied to a dimension that occurs beforefiltering or other analysis operations are done in reporting.
- By default, a dimension value does not have any persistence enabled.
- By default, when any allocation model is enabled for a dimension, an expiration of Session is used.
Persistence settings are, as shown:
Allocation
Allocation applies a transformation to the underlying value you are using. Supported allocationmodels include:
- Most recent
- Original
- All
Most recent allocation
Most recent allocation will persist the most recent (by timestamp) value present in the dimension. Anysubsequent values that occur within the same Session will replace the previously persisting value. Notethat if “Treat ‘No Value’ as a value” has been selected on this dimension, the empty values will bereplaced with ‘No Value’ prior to persistence being applied.
Here is a before-and- after example of Most recent allocation assuming a Session is used for expirationand all events occur within a Session:
Original allocation
Original allocation will persist the original value (by timestamp) present within the dimension foran expiration period. Here is a before-and-after example of Original allocation:
All allocation
This dimension allocation can be applied to both array- based dimensions or single-valuedimensions. It acts similarly to the Participation attribution model for metrics. A key difference isthat dimensions with All allocation can be used in Filter definitions. For example, allows say wehave 5 events in a string field, with allocation set to “All” and expiration set to 5 mins:
Expiration
Expiration lets you specify the persistence window for a dimension. There are four ways to expirea dimension value:
- Session (default): Expires after a given session.
- Person: Expires at the end of your reporting window.
- Time: You can set the dimension value to expire after a specified time period (up to 90 days).This expiration option is only available for Original and Most Recent allocation models. Whenusing time based expiration, values previous to the start of your reporting window (up to 90days) are considered.
- Metric: You can specify any of the defined metrics as the expiration end for this dimension (e.g.a “Purchase” metric). This expiration is only available for Original and Most Recent allocationmodels.
The difference between Allocation and Attribution
Allocation: Think of allocation as a data transformation to the dimension. Allocation happensbefore filtering. If you create a filter, it will key-off of the transformed dimension.
Attribution: How am I distributing the credit of a metric to the dimension that it is applied to?Attribution is not a data transformation, applies during data aggregation, and does not impactwhich data is included using a Filter. Configure the default allocation model applied to adimension. Allocation occurs prior to reporting filters.
- Create and configure a data view definition.
- Add components to your data view.
- Define Data View Settings
Task 1: Create and configure a data view
-
Launch the Customer Journey Analytics UI and select the Connection Menu to display the listconnections, as shown:

-
Type the name of your connection you created, for example Omnichannel Data Connection in the search box on the top right of the connection list. Theconnection is displayed, as shown:

-
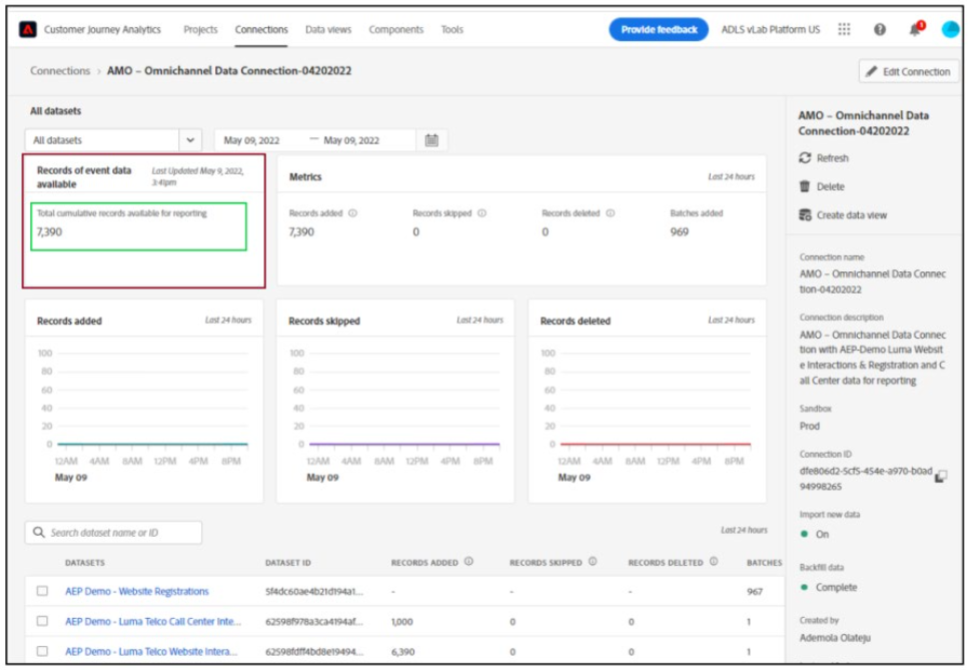
Click the identified connection link from the list to open the Connection Manager. The Connectiondetails opens, as shown:
-
Verify the Backfill data status is complete and you have records in the Total cumulative recordsavailable for reporting, as shown.
-
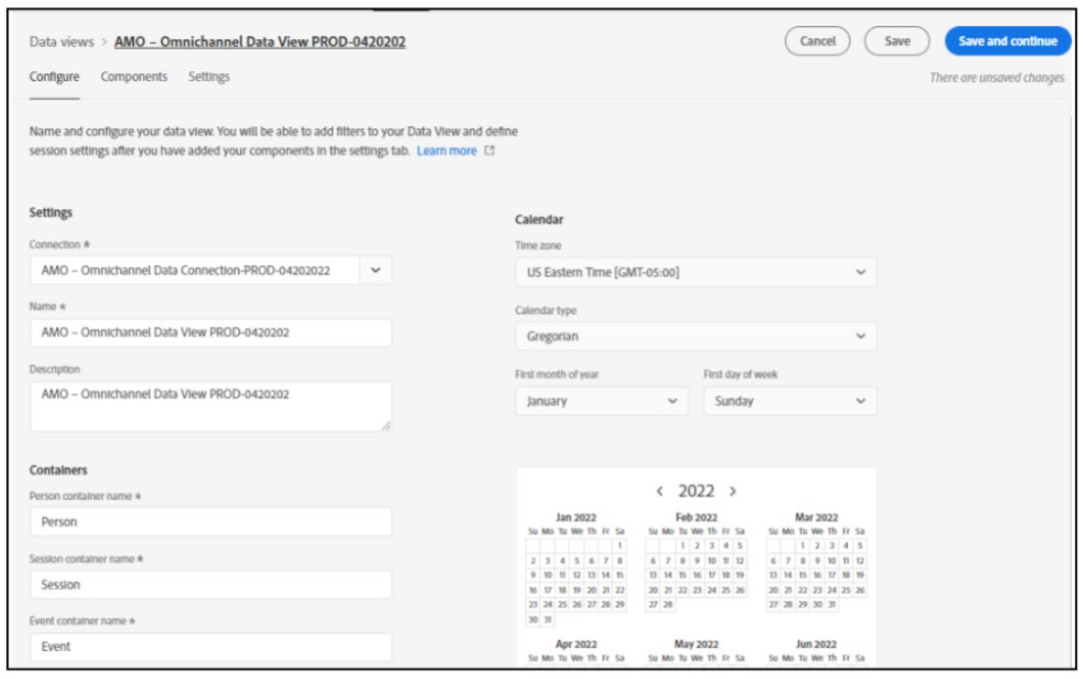
From the Connection details page, click Create data view on the top right corner. The Data Viewpage opens, as shown:
-
Configure the Data View details under the Configure tab as follows
Settings:
- Connection:  <your initials> – Omnichannel Data Connection-PROD-MMDDYYYY, e.g., AMO –Omnichannel Data Connection-PROD-04202022
- Name:  <yourinitials>–  Omnichannel Data View- MMDDYYYY. For example,AMO– Omnichannel Data View-PROD-04202022-DEV.
- Description(Optional but recommended):  type in an appropriate  description
Calendar:
- Set the Calendar parameters to reflect the calendar you want for your data view, as shown:Time Zone: US Eastern Time GMT- 05:00
- Calendar Type: Gregorian
- First month of year: January
- First day of week: Sunday
Note:
- You can have multiple data views based on the same Connection and give them different calendartypes or time zones.
- These data views can allow teams that use different calendar types to accommodate theirrespective needs with the same underlying data.
Containers:
- Container names are frequently used in filters. Accept the defaults -
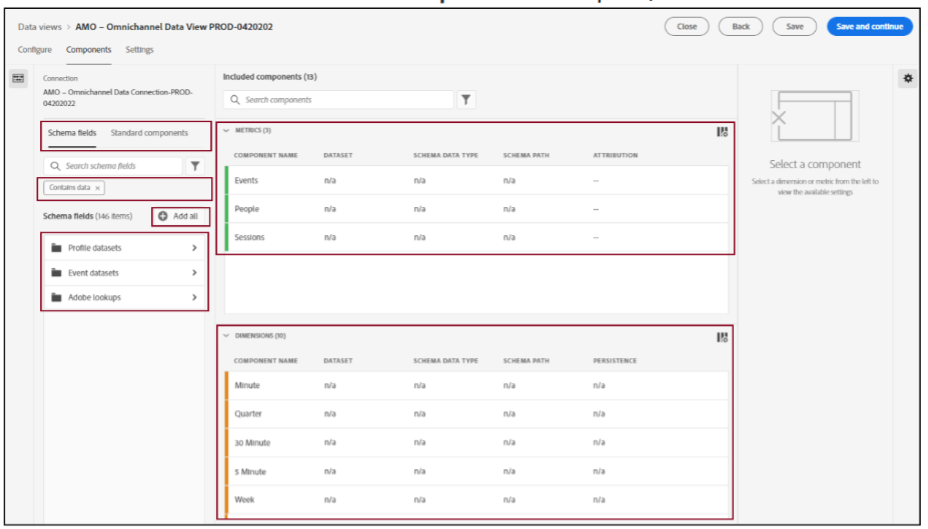
Click Save and Continue. The Add components tab opens, as shown
Note:
- Data Views by default include Standard Components. These are system generated and are required forall Data Views
- Adobe also applies the filter Contains data  by default, so that only Schema fields that contain dataappear. If you want a field that does not contain data, remove this filter.  In this case, you accept defaultsettings to include schema fields with data
- You may choose to click Add All to ass all schema fields for your reports. However, in this case we willadd selected fields and configure the properties.
Task 2: Add Components to your Data View
In this task, you will add components to the data view definition you created in Task 1, configure thesettings, such as name, description, and persistence values allocation and expiration values
-
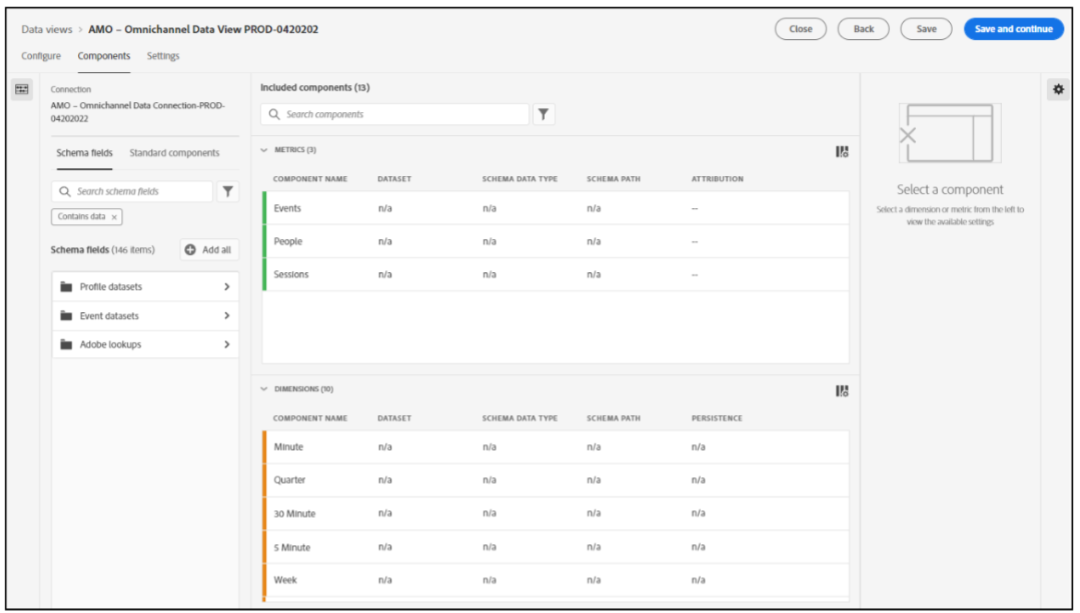
Return to Component tab of your Data View, as shown:
-
Close the Contains data below the search box to include fields without data
-
Let us start with the component: Name (web.webPageDetails.name). In the Search fields searchbox, type Page Name. The search results appear, as shown
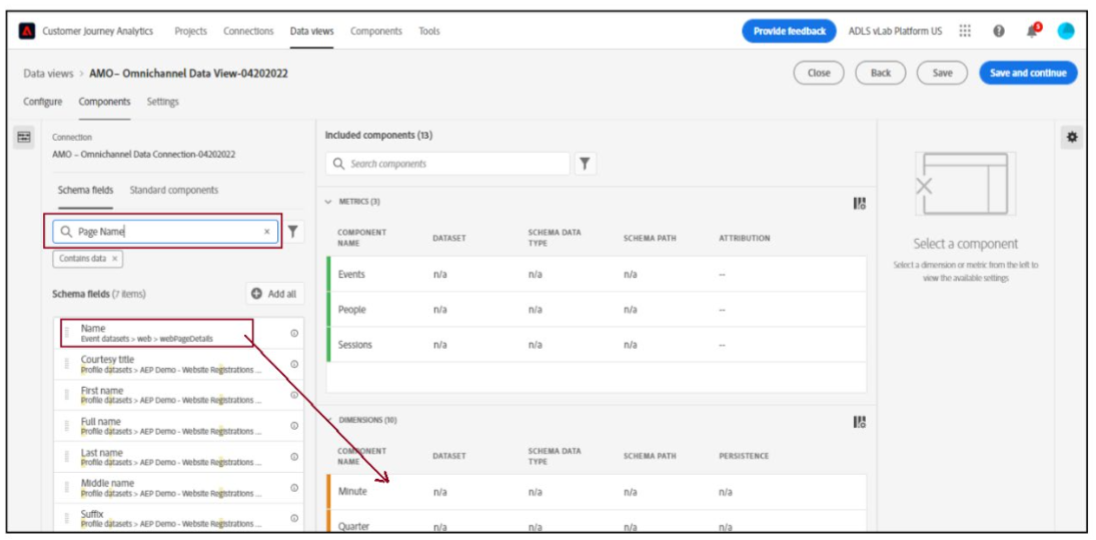
-
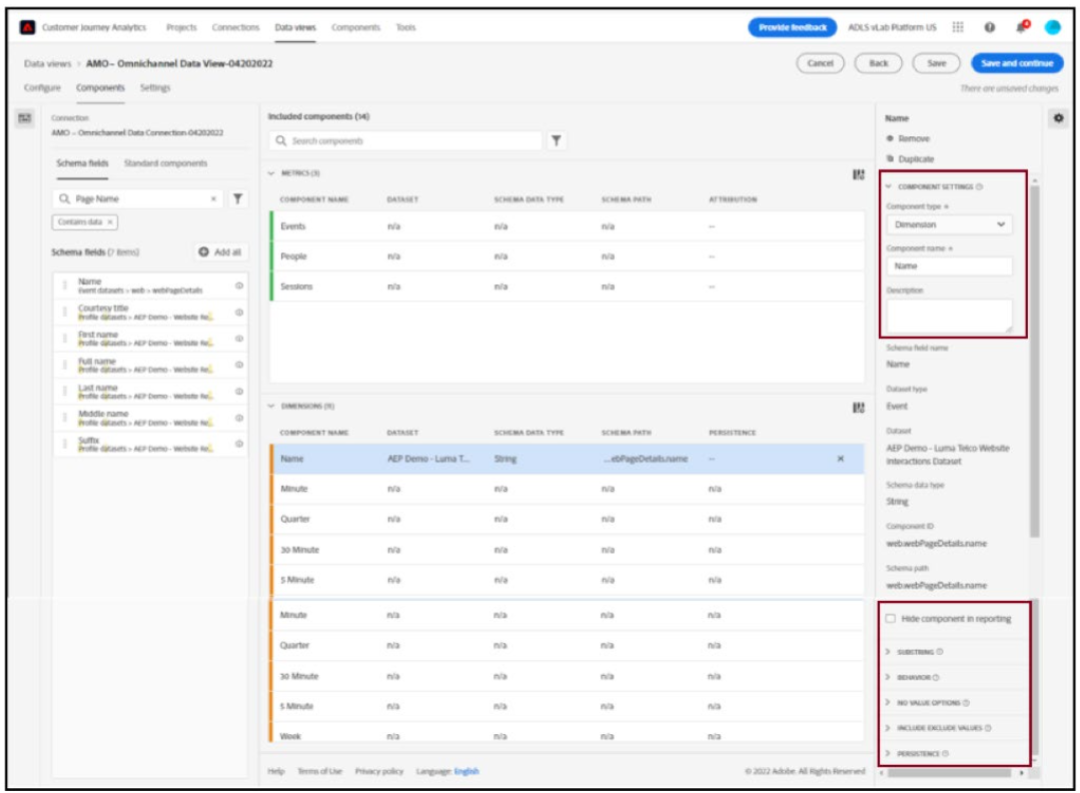
Drag and drop the Name ( web.webPageDetails.name) fie l d into the Dimension section . The Component settings opens, as shown:
-
Click on the component and configure the settings as follows:
- Component name: Page Name
- Description (Optional): Page Name
Note:
- Something really important is the Persistence settings.
- The concept of evars and prop doesn’t exist in CJA but the Persistence settings make a similarbehavior possible.
- If you don’t change these settings, CJA will interpret the dimension as a Prop (hit level). Also,we can change the Persistence to make the dimension an eVar (persist the value across thejourney).
- Let’s leave the Page Name as a Prop. As such, you do n o t need to change any PersistenceSettings.
-
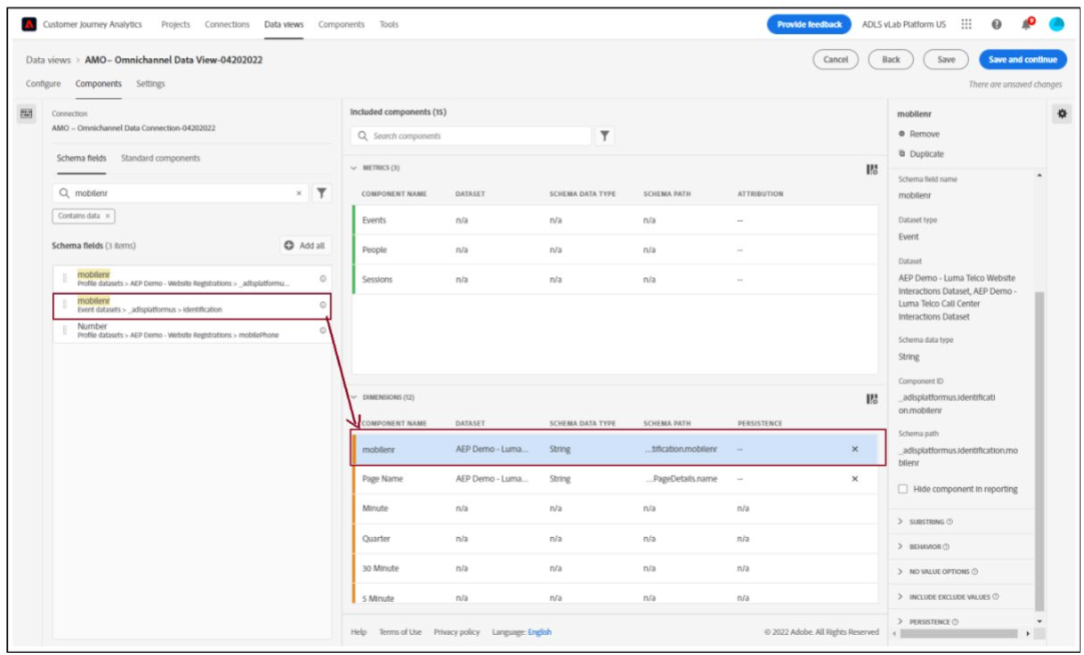
Return to the Schema field name search box and search for mobilenr and drag and drop themobilenr Events datasets>_adlsplatformus.identification.mobilenr into the Dimension section,as shown:
-
Configure the Phone Number dimension as follows:
- Component name: Phone Number
- Description (Optional): Phone Number
Persistence:
- Scroll down and expand the PERSISTENCE settings
- Check Set Persistence and configure the following
- Allocation: Most Recen
- Expiration: Person (Reporting window)
Note:
- We need to change the Persistence settings, as the Mobile Number should persist at userlevel - The Most Recent and the Person (Reporting window) scope, are selected because we onlycare about the last mobile number of that person. If the customer doesn’t fill out the mobilein future visits, you’ll still see this value populated. -
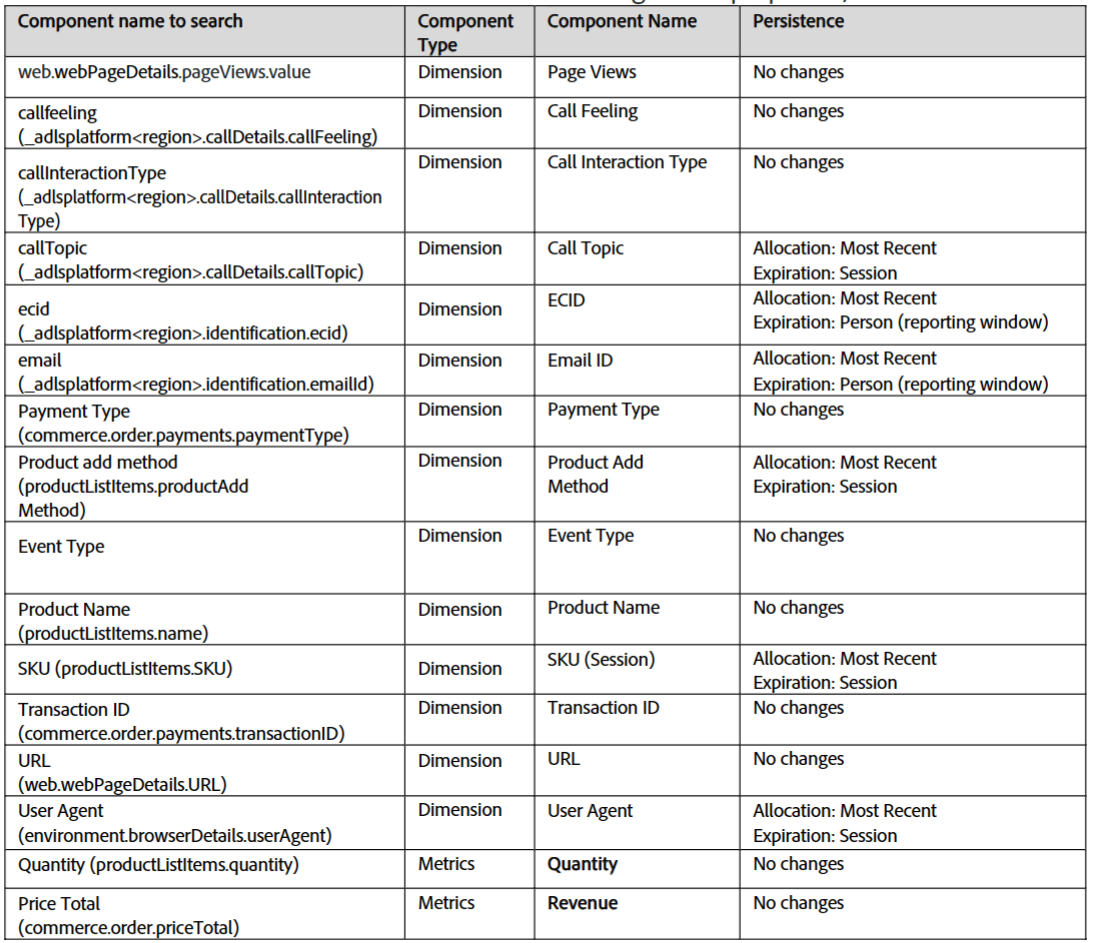
Add the schema fields listed in the table below and configure the properties, as shown:
-
Click Save and Continue to move to the Settings tab, as shown
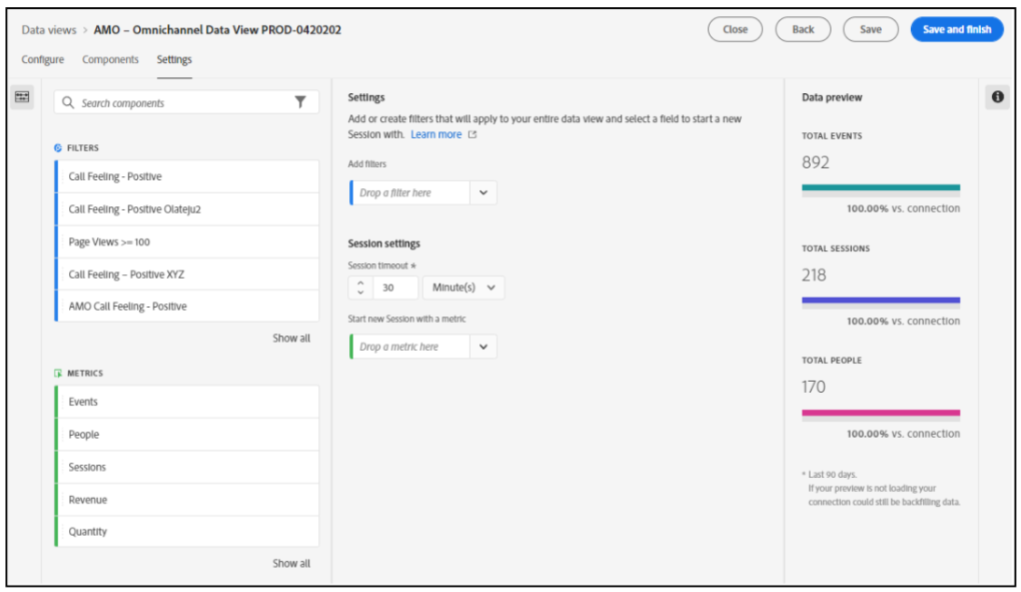
-
Accept the defaults and Click Save and finish. The Data view page opens, as shown:

